 |
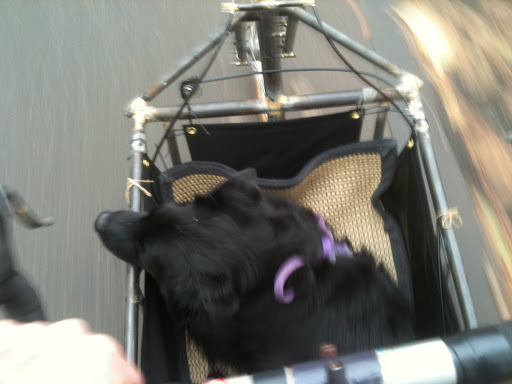
| Near Timothy lake. Dog would prefer to just relax in the basket for now. |
 |
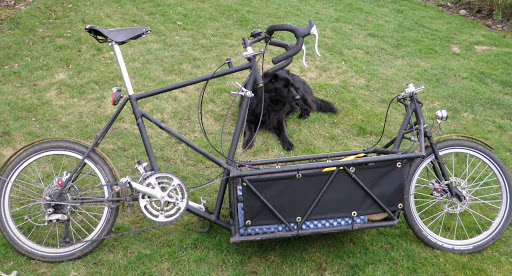
| Current configuration, with mt style handlebars and dog in the basket, and custom rack on the back. The steering pulleys have been moved to the fork crown line. The bike weighs 43lbs. |
Note that this post was made in 2010 and some writing is dated. Lots has changes since then.
A one year/5000mile update has been posted HERE.
In Portland, Oregon, we have 3 shops dedicated at least partly to selling cargo bikes. I wanted to find a bike I could use to carry my dog around with me.
Clever Cycles, Splendid Cycles, and Joe Bike, all sell various types of load carrying bikes.
All those bikes would excel at carrying large/heavy loads, but I wanted something a little smaller and lighter that I could stretch out on with drop handlebars. As an amateur framebuilder, I would probably like the challenge of project like this. And if I made it myself it would cost about $1K ( using some parts I already had) instead of 3 to 5K for a brand new cargo bike.

 |
| Francis Cycles smallhaul cargo bike |
There’s a happy dog, cruising down the California coast. The bike is about 37lbs, can carry up to 80lbs. I saw it first at the Portland handbuilt bike show in 2008. There were crowds around it most of the time. It was written up in the Bicycle Quarterly in the winter 2008 issue with a good review.
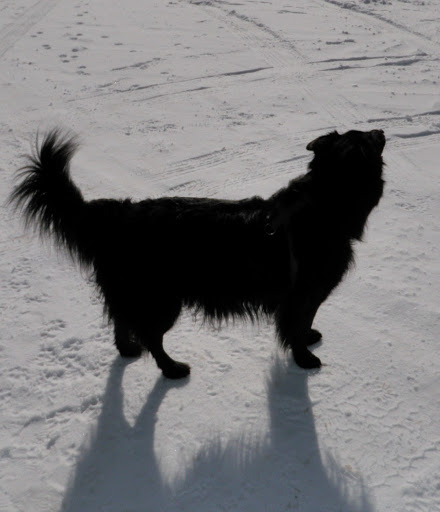 |
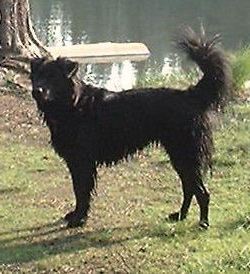
| Sadie the dog |
She is 10 years old and 60lbs and likes to run around in the woods. During her youth she would run about, while I would pedal my mt bike on forest tracks. She would cover 1 1/2 miles for every mile I pedaled, usually staying within shouting distance of me. Running 30 miles in the woods during the course of an afternoon was what she liked to do.
 She is not so happy in that tall plastic box, but she obeys the chicken sticks.
I don’t intend to move a dresser or refrigerator (although being able to carry a person in a pinch would be nice). I mostly want it for the dog, general utility, and/or possibly a touring load. The dog needs to have the space to be able to lay down, because maybe we are going a long distance. So I wanted to see what the smallest size space she could occupy was.
 That is about as small as I would try to squeeze her. About 17 X24 inches.
 I made a drawing with an architects ruler on a sheet of watercolor paper….

A bit faint; it was made with pencil. Click for big if you want to scrutinize it. Some tube sizes and wall thicknesses are indicated. Having worked extensively with cromoly tubes already in a number of different experimental bikes, I already could make educated guesses as to what I would need for the design. The basket has laterals that will be like a truss. I first thought the floor of the basket could be nylon fabric, but later changed it to plywood, so the basket base could slide over a stone or hump when I am rolling down a trail. The step-over point for the dog is about 10 inches off the ground with the bike tilted to the side, which will make it easy for her to get in and out.
Front to back:
A 20 inch (406) front wheel is used in most long-john/bakfiets designs. It is very strong, reduces the wheelbase, and gives good handling characteristics. A front linear pull brake was tried, but later changed to a disc brake, as it proved totally inadequate. Generator front hub. I would set the head angle to 73. That’s apparently a common head angle used for bakfiets. Fork offset will be 30mm. This should work fine for the handling; I guess I will find out.
The basket clearance from the ground would be 6 inches up front. This should allow me to drop off curbs without hitting the basket or fender. The rear of the basket would be 4 inches off the ground. This is about an inch higher than the pedal would be at the low point of it’s revolution, so I think it should be enough; but I will have to ride it to make sure. Basically, this is as low as I would dare to put it. And it is lower than any other cargo bikes out there to my knowledge. The lower, the better, as far as handling is concerned. But I don’t want to scrape the ground on uneven surfaces.
Rear head and seat tube angles about 72 degrees. Top tube: sloping down a lot with a long seatpost. Effective top tube length same as my usual bike, 22.5 inches. Using my usual 406/40mm tires, the bottom bracket center will be 10.25 inches off the ground , which is rather low, especially on a long wheelbase bike like this. But it does make it easier to put he foot on the ground at a stoplight. The rear wheel will be 20″ as well. I will design the stays and fork so that there is enough clearance for a Schwalbe Big Apple tire (406/60) with fenders. The chainstays will be shortish to decrease the wheelbase, probably 17 inches. They will be “wishbone shaped”, which I can do since the rear wheel is only 20 inches in diameter. This will allow me to have a triple chainring, but with a double spindle. There will be no problem with chainstay clearance, since only one chainstay tube will be attached to the bottom bracket. The shifting will be much better this way. I only use the inner chainring with the few inner cassette cogs, so the chainline will be fine.
The small rear wheel is a departure from the norm for these bakfiets type bikes. No need to carry 2 sizes of spare tubes or tires. Much stronger wheel, and a very low derailleur gear can be achieved. The top gear will be adequate (52 x 11 tooth makes about a 90 inch gear). A special brazeon will be needed to mount the front derailleur since the angle will be different, due to the lower rear wheel spindle of the smaller wheel. A rear disc brake will be used. Dual disc brakes is the best option for small wheel load-haulers. There is just not enough rim material to work with for stopping using rim brakes.
The frametubes will all be straight gauge aircraft cromoly. The top tube will be 1 inch.

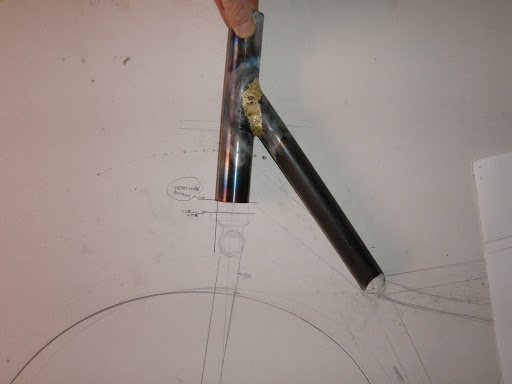
I got the tubing from Aircraft Spruce. They are a great source of supplies for cromoly steel tubing; easy to order and fast shipping. There is about $250 worth of tubing there; many sizes and gauges, including tubes for a rear rack. The drawing helped me to order what I needed. I was able to limit the lengths to 5 feet and still be efficient (minimizing waste pieces). The small parts in the foreground were from Nova Cycle supply. There are dropouts, bottom bracket, and fork steering crowns. One special part would come from Francis cycles. The steering pulleys that connect the front and rear steerers via brake cables.

Custom steering pulley. A set of 2 from Francis Cycles is $175. I thought of cobbling something together on my own, but these are the bees knees, and after all, he was the first to design and build cargo bikes with cable steering pulleys that I have seen. He designed the pulley set and had them made by a machine shop (Paragon) that specializes in doing bicycle part fabrication.
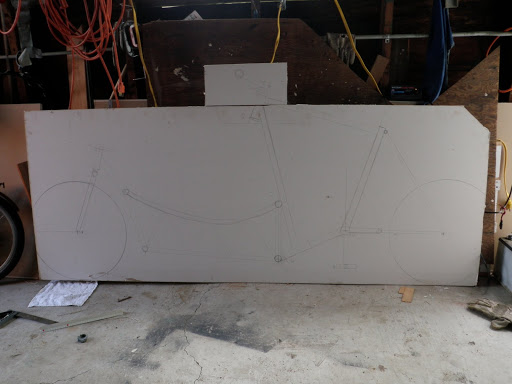
Here is a life size accurate drawing of the bike on a piece of sheet rock. A patch of sheet rock is placed on top to determine the location of the handlebars (this piece of sheet rock is not tall enough). I will hold tubing assemblies up to this drawing to determine lengths and angles. Building this will be done one tube at a time, with very little use of fixtures. I learned to build frames from a binder/book written by Tim Patereck. His instructions were based on a method of building that does not require a frame jig. I would not use a frame jig unless I was in the bicycle frame building business, making lots of frames.
What follows from here is an account of a bicycle framebuilding process not easily understood unless you have some background in this. Interested readers could study a previous post to get a better idea of what I am talking about….


Breezer dropouts; ready to be brazed in place. The wheel you see assures the final width of the dropouts (135mm), and the alignment.


Next, I attached the bottom bracket to the seat tube. I built up brass along the sides, but only had a thin film elsewhere. Other tubes would overlap these areas later.

I need to make a lug like thing for the top of the seat tube, that the toptube can connect to. And it needs to have a seatpost clamp and a place for the seatstays to connect to. This is it….

I cut it with a sawzall and ground it with the grinder to come up with this.

Then I silver brazed it to the top of the seat tube.
Here I am setting up the chainstay tube to the bottom bracket; filing, measuring, checking for parallel etc. The tubes running thru help me with the alignment.

Chainstays brazed in place. A little cold setting was needed to bring it all into proper alignment.

Here is the seat clamp bolt assembly, with the seat stays attached. The slot for pinching the seatpost has not been cut yet.

The disc brake attachments. Custom made. You can get flat plate dropouts with these designed into them, which eliminates this kind of work. I like to use tubes though, and I have the time to do this. I used the wheel/disc brake and disc to provide the jigging.

Setting up the tube forward of the bottom bracket. The drawing on the sheetrock puts the distance from the outer upper edge of the seatpost tube to the lip of the forward tube at 710mm. I set it up like that, and it turned out as planned.

All bottom bracket brazing is finished now.
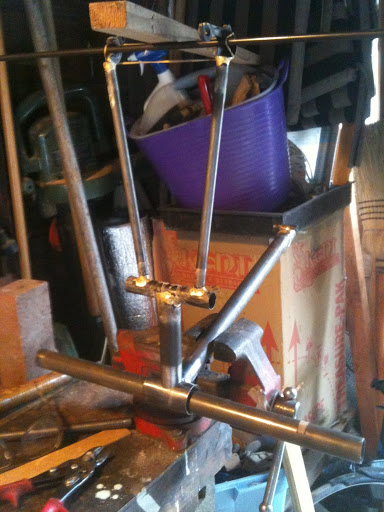
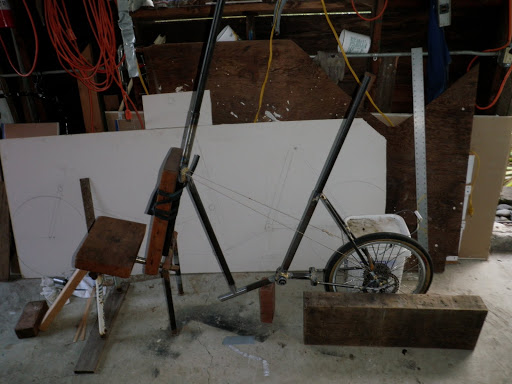 Here is how I jigged it all up to get an accurate joint; where the “down tube” connects to the tube that is forward of the bottom bracket. Kind of Rube Goldberg like. Bricks, wood chunks, inner tube strapping, long tubes to check parallel, etc. The chair in the photo did a good job holding the front end up.This joint was quite important and took about an hour to set up before I could braze.

Next I will braze in the top tube, and cut the excess headtube away.
 Cutting and fitting the toptube took about an hour and a half. Alignment concerns were not there. All I had to do was fit it in the empty space. I brazed it in and cut the head tube down to size. The rear of the bike is mostly done, but later I will probably braze some tube or another in the middle of the triangle to give the force of the top of the basket something more substantial to brace against.


Setting up the lower basket frame to braze to the bike. It is all on a Very Straight Board, and jigged up to ensure it is all aligned correctly.

After brazing the lower basket on, I am setting up the upper basket frame. There are vertical supports in place you see that will get brazed in. Where the upper basket frame meets the “down tube”, it has been mitered, so that it nestles in to the other tube about 1/4 inch.

Meanwhile, I have been getting the fork ready. Here is the fork steerer with the crown and bearing race brazed on. The crown consists of 2 tubes, brass fillet brazed, perpendicular to the steerer, and the bearing race was silver brazed in place. Later, I will put the fork blades in (7/8 .035″ round tubing). This will make a sturdy fork.

Upper basket frame brazed in, with 2 rear vertical supports.

The verticals of the basket are in place and I just tested for strength. With me on the bike and 60lbs in the basket, and supported at the front end, it sags at the rear of the basket by one centimeter. Too much. So I will need to add reinforcing tubes, as I expected. The sides of the basket will look like a truss. There will be a tube to stiffen the center of the bike frame triangle. That will keep it from sagging.

A tube is placed here to reinforce the upper basket; ready for brazing. The upper basket frame will be under compression, while the lower frame will have tension. I found that with 150lbs in the basket and me on the back of the bike, the upper basket tube flexed backwards about 2 or 3 mm on each side.

Meanwhile, the fork blades (7/8 .035) are jigged and ready for brazing. This is called a segmented fork, since is uses all tubing (no plates or casting).
Using my Very Flat Board here.

Additional diagonal braces are placed here to reduce flex. All the reinforcement makes the bike feel noticeably more rigid. Although it is painful to add extra tubing (more weight). But when I find a place that needs more support, I will put extra tubing there. Getting on the bike, and loading it with bags of concrete, I can find the weak areas…

The seat binder slot was cut with a sawzall, and I reamed the seat tube with an adjustable reamer. The seat tube is a 28.6 OD tube (.035 wall) that accepts a 26.8 seatpost perfectly as is. But with all the brazing, it has been distorted, and needs reaming.

I tacked the dropouts in place, using the wheel as a jig to place them correctly.

I put crescents of cromoly tube at each side of the dropout to fill the void. I could just fill the space with brass, but that would be a LOT of brass. Doing this dropout work took 2 hours.

The jig setup for the linear pull/cantilever brake brazeons. Cantilever brakes performed poorly however. I abandoned them, and used a disc brake instead.

Finished fork! There is plenty of room for a Schwalbe big apple 60mm tire, with a fender, if I want to use it. I still need to braze coins on to each side of the crown. Unfortunately a lot of work for nothing; I would cut the dropouts off this later to make adjustable dropouts. This is the first of 3 forks I made for it. The third one is the charm.
Getting ready to braze the last joint that requires careful alignment. The headtube is already attached to the tube connecting it with the basket. I used the drawing to get that done right. Now that I know the final fork length and have the headset, I know where the bottom of the headtube should be. The miter at the other end was done with much care. This will set up the front end alignment.

Setting up for brazing the front headtube into position.

Headtube on. I brazed cable stops for the steering, and set it up. It’s a bike! I put the rear brake on and rear derailleur and took it for a ride. Rides like a Cadillac! All that structure up front absorbs jolts and road shock. I found that the head tube angle is 71.3 degrees; so I will do some cold setting. The tube must have crept a bit when I was brazing. As is, the bike weighs about 35 lbs. Still need front derailleur, front brake, lights, and fenders, and other reinforcing tubes along the basket and at the front end. I think the final weight will be about 40lbs.

Diagonal head tube to frame reinforcements have been added. The basket laterals have been reinforced with tubing. There is nothing like a triangle to reduce flex in a structure.
The bike in now much stiffer. I can stand in the basket and there is very little flex. This may be enough structural tubing, but I will try it with 150lbs in it rolling down the road to make sure. If there is more flex than I will am comfortable with, I will find the weak areas and reinforce them.
The steering requires frequent input, and cannot be ridden hands-off. This is typical of all bakfiets type bikes. After riding the bike for awhile, I get used to it and don’t notice it as much. Going slow uphill, it needs more frequent corrections, while going fast downhill, it feels very solid and stable. Later I made an adjustable dropout for the fork, to test different rakes and lengths, and and find a more neutral setting that will work the best with all speeds.

That dog has no idea of what kind of experiences await her on this bike, but if this basket had a floor to it she just might jump in.
 |
| All done and outfitted. Sadie is patiently waiting for her morning cruise to the bakery. |
 |
| No kickstand necessary! |
This is huge. I can just get off the bike, and it leans up against the rear corner of the basket. Very stable. The wheel can be pointed in any direction, the dog can be in the basket; it does not matter, the bike will stay securely propped up. I can tie the dog to the bike and it will act as an anchor to keep her from wandering away.

The front derailleur needs to be set back, since the rear wheel is smaller and the cassette sits lower. I made a brazed on thing for the clamp-on derailleur to attach to. This amount of setback will allow it to work like a normal derailleur.

What you see here are adjustable fork dropouts. I used these for a week, trying to find the best fork offset. The third fork I made for this has a 26mm offset and the bike handles great.
When you first try a bakfiets, you are told to look at the road (not at the bike), and try not to think of how to steer it. That is good advice, and will send you down the road in a controlled manner, but it really takes more time to master riding it. New neurological pathways need to get established in the brain. Things happen slower with handling, and corrections can over-compensate. When going slow (where unintentional weaving is more likely), I may steer from the top of the bars, closer to the handlebar stem, and make more frequent small corrections compared to my normal bike. Now I can ride this bike at walking speed now without any wobbly or wandering issues. I think this is true of all bakfiets type bikes, where the front wheel is way out in front of the handlebars. I can easily stand up on the pedals and power up hills, with or without the dog. When I ride a normal bike now, it feels nervous and jumpy for the first few miles or so, I miss the limo-like ride of the cargo bike. The “crush zone” in front of me on this bike is somehow reassuring.
The regular stainless cables in stock Shimano housing lubed with garden variety grease had some friction. This was with the initial rather long cable routing. It made steering a chore. If I didn’t have some play in the cables, steering would actually get rather tight. I tried lubing with Slick Honey, WD40, and silicone. Nothing seemed to work very well with the slack taken out of the system, and the grease just seemed to make it worse. Eventually the cables and housing were pretty gunked up with various lubricants and steering seemed rather stiff, even with some slack in the system.
Next I tried Gore RideOn cables. The cables were expensive ($74 for 2 road brake sets; you can’t just buy 2 rears like I need), but I found that they improved the steering substantially. With these cables, I could adjust it so there is no play in the steering, but the friction is low enough to be acceptable. But after about 200 miles, the steering got stiff again. I took the cables out and found that the coating on the Gore cables was starting to shred. They could no longer easily slide in the housing because of the shredding coating, and I had to throw the cable set into the trash. It was an expensive experiment. The worst shredding was on the left cable, which was in tension when my dog would lean to the right (which she did a lot), and I would have to compensate by steering to the left.
So then back to new uncoated stainless cables, new Jagwire standard housing, and I tried CableMagic lubricant. More importantly, I began using brazed-in-place cable stops, which reduce the amount of housing I have to use. This is probably a big factor in the reduction of friction. It works pretty well and the friction is minimal, as long as I keep some play in the system. If all the cable slack was taken up, the steering stiffens up. The play in the system is something wasn’t a big deal though. Then I tried Finish Line Extreme Fluoro grease on the cables. It is used for S and S couplings which are made of stainless steel, just like the brake cables. It seemed to work a bit better yet, and the cable slack I need to have is minimal. Then I tried the Dri-Slide and it seemed to offer yet another improvement in steering feel. Used with stainless cables and standard Jagwire housing. Easy to coat the cables too. I just flow it in at either end, and gravity and capillary action takes it in. Slight steering corrections are transmitted to the forks now that friction is low and play in the steering is quite low. This improves the bikes handling too.
Next I tried using galvanized brake cables. Galvanized cables have lower friction than stainless cables according to research done by the Gore Ride on cable people. My guess is that the stainless cables tend to displace lubricant coatings during use, while the galvanized surface retains the lube film better. Since I could not find any tandem length cables in galvanized locally (they can be ordered at amazon), I had to interlace and silver solder 2 brake cables together for each side. I used the old standard Jagwire housing, which has a bit of residue from other lubes still in it I suppose. I flowed the dri-slide in, and the steering is very smooth, even with almost no steering play.
Finally, I moved the pulleys to the fork crown line, at the bottom of the headtubes, which reduced the length of cable and housing I needed to use by 7 inches each side. This routing also made very clean lines; with smooth shallow curves in the cable housing. No areas with even a slight kink. This seems to have had the biggest effect on reducing steering friction. I am using Slick Honey grease with this and it works very well. There is no play in the steering and is is smooth and easy. Also, I made one clamp-on housing stop, so I can easily loosen up the cables, slide the housing toward the center, and clean and lube the cables easily; all without taking the cables out of the pulleys. Now it is easy to maintain the lube inside, so I do it once a month.
The bottom line however, is that cable steering has its advantages and limitations. It is not appropriate for very heavy loads where steering forces are high. The friction that can develop in the cable with very heavy loads is too much, A solid steering linkage is better to push really heavy loads around. But for loads of up to 100 pounds or less, it works quite well. The overall weight of the bike is reduced, and the cargo basket can be much lower, without any steering tubes taking up space.
I think that the low 4.25 inch vertical clearance (19 inches wide) at the back of the basket will work out for me. It may scrape the ground sometimes on steep driveway to street transitions when I lean the bike. I can drop off (or hop onto) 6 inch curbs without scraping. It scrapes the ground so rarely that it is not really an issue. I cannot lean hard into an off-camber corner though without having a scrape, so it is a small compromise. While I have a plan to increase the ground clearance if I ever decide it needs it, I doubt that the effort to modify the bike in that way will be worth it. I have never smacked into anything on the front corner of the basket, which is 6 1/2 inches off the ground. There is a metal plate in the front corners there that would help the bike ride over an obstacle that it could encounter.

Sadie the dog rolling down the neighborhood streets. she likes the view from the bike.
She can get in and out of the bike easily by herself. Other cargo bikes would require me to lift her up into the cargo area. She is 65 lbs and does not like to be lifted, so I am happy this worked out.
A one minute film starring Sadie the dog, the bike, and the bike builder.
A short film of a ride thru Westmoreland park and Riverside cemetery in Portland.
 |
| Painted, as seen with generator lighting system, Schwalbe big apple 50mm tires, dual disc brakes, and fenders , the dogbus weighs 43 lbs. |
 |
| There is about 10 hours of work into the rear rack, which weighs one pound. Mostly 5/16 .035 cromoly tubing. I will need it for camping when I take the dog. The short pieces of tubing at each corner give me something to strap a bungee (or inner tube strap) around. It makes getting a load on and off the top of the rack easy. It is made to fit over the 20 inch wheel and clear the disc brake on one side, and the derailleur on the other.. |

Looking down into the basket (without the mat), I brazed in cross brace tubing at each corner, and bolted a plywood sheet to the bottom. This reduced side flex, and gave me a more reliable cargo floor.
The bike pretty much finished, but remains a work-in-progress.
Now that I am riding it on a regular basis; commuting, errands etc (over 100 miles a week), it feels quite natural. My 26 mile 2000 ft climb round-trip commute takes me a few minutes longer than my usual road bike I suppose (which weighs 13 pounds less). The long cargo area up front cushions any bumps the front wheel rolls over, which I appreciate. I am getting to like the idea of a “crush zone” in the front end which could add protection against getting doored. Doing an endo (flipping over the bars) is probably impossible on this bike. I haven’t crashed, but if it happens the “built in kickstand” may keep me from going down. And the cargo space on this bike is really convenient. I can stop at a garage sale and roll away with some pretty big items. I will probably take it touring this summer, and I intend to take a lawn chair with me.
5000 mile/1 year update HERE

that's one lucky dog; all she needs now is an umbrella for rainy days..
LikeLike
You could entice me to sit in it with a chunk of rocky road from Sees.
Nice project Drew. I wish you lived next door.
Bro Ramsay
LikeLike
Great post. Looks like a smashing bike too. Envious.
LikeLike
This is AWESOME!!!
LikeLike
This is a great story, thanks
LikeLike
Super!- Really great job- thanks for keeping me posted on your progress. Must feel great to ride.
josh
LikeLike
Woof, woof. Pant, pant.
That was Peanut, our necrotic beagle. He wants a ride.
Ramsay
LikeLike
Drew: I've got all of your love for dogs, but none of your bike-making and welding skills.
You must be a good man.
I posted the video on UtilityCycling.org
http://www.utilitycycling.org/2011/01/cargo-bike-designed-for-a-dog/
LikeLike
Thanks for sharing.
LikeLike
wow.
All that for the dog! I think I'd get a smaller dog and stick him in the saddle bag.
How do you decide when to use brass and when to use silver when you braze?
Cheers, that was a very interesting post
LikeLike
Thank you so very much for sharing such a brilliant project !
I have a name for it : DogBike !
Yeah, I know, not that difficult to think of but sounds good.
Cheers
LikeLike
Wow, thank you so much for this incredibly thorough overview! I've been working on a design for a tall reverse-delta cargo trike, and the steering is the hangup right now. Originally, I was looking at some combination of steering columns, pillow blocks, pulleys, etc, but the directional flexibility of cable-based steering seems to be the way to go. You said that the cable seems to get tight when steering; do you think this is a function of using a cable, or merely of how much housing it passes through?
LikeLike