This essay is on an early version of my 20” wheel portable folding bike that I made in 2012. You can find the most recent 2021 version of this bike here.
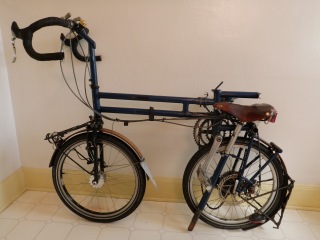
Here is a group of photos of my most recent 20″ wheel portable bike. I made about a dozen of these (similar to this one) over more than a decade. This one has all the R&D from lots of miles and lots of experimentation from the previous ones. There is a big bone pile of what did not work well, and what I improved upon. This particular bike is about 3 years old and has at least 12,000 miles on it. A touring journal using this bike is here. I did a full randonneur series on this bike.
Disclaimer: This is only a photo essay of my experience in an alternative bike design! I am not suggesting you build your own bike or copy this example! Save yourself the hazard and the hassle and go buy a folder at your local bike shop! One could ask a framebuilder to look at this webpage and try to make one. But the work involved is so much more than a conventional bike you would not be able to afford it.
There is perhaps enough information here for an experienced framebuilder to make this but it would be quite a challenge for anyone else. A lot of work goes into a project like this. I could probably build a conventional not-fancy bike frame in 3 or 4 of long days, but this one would take several weeks. So many small parts that need to be brazed, and there is a lot of creative jigging to set things up. But the result is a very reliable all purpose bike I would take anywhere, commuting, touring, dirt road or light trail riding. And it gets very small in about a minute and a half.
 |
| What does it have? Built in front rack, bolt on rear rack, drop handlebars, fenders, front and rear generator lights. |
 |
| Triple chainring, 135mm rear triangle with a 9 speed cassette hub and a rear disc brake. It weighs 31 pounds as you see it here. |
 |
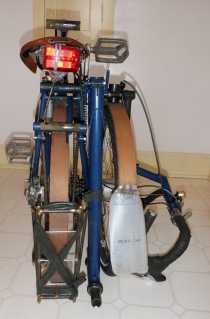
| It gets small in about a minute and a half. 27x21x11″. Without the rear rack and fenders, it would be 19″ wide instead of 21″. Props itself up like this, or on its side. I can pick it up from anywhere and it all holds together. |
Design considerations:
It’s like a cross between the elements of a Brompton and BikeFriday. It gets smaller than a BikeFriday, and in less time, and holds together without needing a bag.. But it still has all the full bike features of a BikeFriday (drop handlebars, full range of gears, etc). It’s not that much bigger than a Brompton when “folded”, and does not take that much longer to fold it, but it is much more bike than a Brompton is.
The key here is that there is only one folding function on this bike: pushing the rear wheel under. The rest of the process involves separation of frame elements and clamping them together to form the “folded” package. That allows a frame design with less limitations dictated by folding requirements, and allows the use of standard bike componentry. Tubing is almost all cromoly aircraft tubes fillet brazed together. There is silver brazing where there are “lugs” (seat post extender, connecting tubes at rear of main boom tube). Geometry is pretty standard; 72-73 angles, 40″ wheelbase, 25mm fork offset (short fork offset because of small wheels), 10.25″ BB height. It duplicates the position I have on my regular big wheel road bike. Lots of low gears of course, and the 53×11 top gear is an acceptable 90″. I don’t spin out that often.
A 20″ (406) wheel size is the best option for a bike like this. This tire size is available everywhere, from bike shops to variety stores, and there are lots of choices in this size from many makers. The Schwalbe marathon supreme 406-42 is a wonderful light, durable, and supple tire, and my current favorite. The front hub is a 74mm wide type found only on folding bikes. Formerly, I used the standard 100 mm wide hub, but now that high quality 74mm front hubs are available, there is no reason not to use them. It saves an inch on the width of the folded size, and that is huge. The front hub on this bike is a Schmidt SON XS 28 hole generator. The rear hub is a Shimano 135mm with a disc brake. 135mm is the standard mountain bike/internally geared hub size, and I don’t want to be limited by a narrow rear triangle. The rear disc brake allows me to brake without wearing the small rims down. With rim brakes, I would wear out 3 rims a year, since I live in rainy Portland, OR. Sometimes the worn rim would just collapse, causing the tire to explode off the side. The front brake is a linear pull rim brake which I use only occasionally, for hard stops.
 |
| Front rack is brazed in place. Edelux light has a special protected spot where it won’t get knocked out of place. There is a linear pull brake with a travel agent (for road levers). Just below that is a fat tube sticking up. When folded, the handlebar stem clamps there. SON-XS 74mm front generator hub is visible. The fenders are 3 thin layers of cedar, glued up together with gorrilla glue, using the wheel with the tire on it as a form while the glue was setting. Duct tape held things together while the glue set. |
 |
| Looking down at the handlebars. A clamp device brazed on the stem is seen here. It holds the bar end shifters. The bar ends are threaded together so they stay parallel, and the clamp secures it all in place. This is a nice way to shift gears, and works well with the folding. |
|
 |
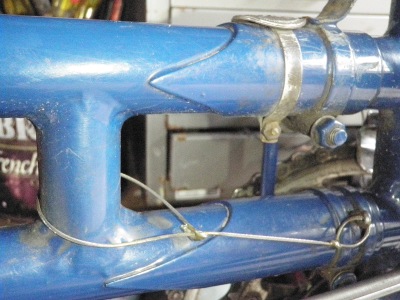
| The boom tube. Two 1 1/8 tubes (.035). Connects steering to seat tube area. On the left, handlebar stem clamps on top, and forks clamp below. There are indexed to hold them in place should a bolt break, or if I forget to tighten them in a moment of cognitive decline. On the right, an upper and lower lug (1 1/4 .058) to accept the assembly on the seat tube. Tightened by levers brazed to 5mm bolts. A pin goes thru the lower lug and tube to resist pulling forces. A cable keeps it from being lost. All the unpainted tube connections are lubed with Boeshield. Once a month or so I clean and lube all the places where one tube inserts into another tube. |
 |
| Connection at seat tube. The short robust seat tube is 1 1/4 .065, reamed with an adjustable reamer to accept the 1 1/8 .058 tube seat post extender. I can’t have any play in the seat post extender; it must fit like a normal seatpost in the seat tube. All the others are slip fit tubes, using .058 walls, so that the next 1/8″ size down has a little wiggle room. It’s also the clearance I need for brazing, if they are to be connected. That curled thing you see with a brass bolt thru it fixes the boom tube in place when the bike is folded. In front of that is a St Christopher medal. Patron saint of travelers. They used to sell them at bike shops. This one came off my 1950s Ideor. |
 |
| Rear rack has posts on each corner to lash stuff down with. They allow me to put a sack of groceries on top of the rack and secure it in place with a bicycle inner-tube (narrow 700c tubes work best). I wonder why custom racks (or stock/aftermarket racks) don’t come with these. Someday I will paint it. |
|
|
 |
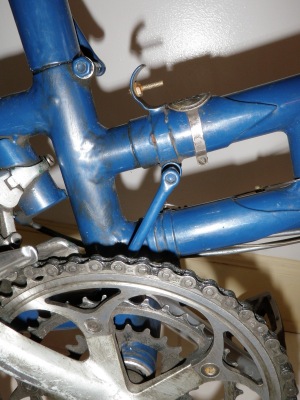
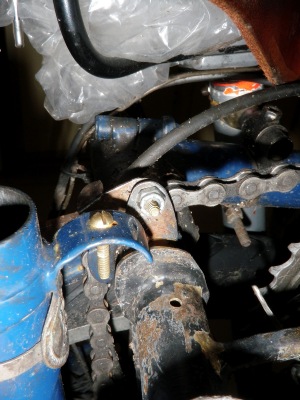
| The hinge to drop the rear wheel down. A 1 1/8 .049 tube extends from just above the bottom bracket. It meets a wide clamp; you can see the bolt just above it. That grips a hinge pin, a 5/8″ cromoly tube.. The hinge pin has the chainstays clamped tight on the left and right sides. The hinge pin is greased, and the central clamp bolt controls how easily the wheel drops down. The front derailleur is clamped to a tube that puts the derailleur at the proper angle. Since the rear wheel axle is lower, the derailleur needs to be rotated back a bit. |
 |
| Wheel in place. “Seat-stays” connect to upper frame assembly; it just drops into place. Nothing is needed to retain it. There is a bolt I can put thru there that will keep the rear wheel from being pushed down. I use it when I am touring and have a lot of weight over the rear wheel. That way, if I lift the rear of the bike, the wheel doesn’t drop. Lower seat stays are 1/2″ .049, upper 1/2″ .035. They look thin, but seem to do the job just fine. |
|
Folding it up
 |
| First I drop the rear wheel down. The chain is captured on the hinge; a small collar of metal keeps it there. The tire butts up against the bottom bracket which keeps it from moving. Whenever I park the bike, I drop the wheel like this. It keeps the bike from rolling or falling. The fork is 90 degrees vertical now and the front wheel is resistant to turning, so I can lean it securely against anything. And it looks too weird to steal. The saddle is chest high; “the person riding that bike must be 8 feet tall” is what I hear people say. |
 |
| next I take the seat extender out and fix the seat assembly against the side of the frame with 2 connecters I made. |
 |
| Now I split the bike; loosen the clamps, pull the pin, separate halves of bike, and fix the fork against the frame with 2 other connecters I made. Also, I pull the wire connection for the tail light. Or if I forget it just pops out. |
 |
| now I remove the boom tube and the handlebar stem. I fix the boom tube in place between the wheels.You can see the handlebars laying to the right. |
 |
Next I clamp the handlebar stem in its place, just in front of the fork, and I am done. A cutout in the front rack allows the stem to sit flush. About 75 seconds total to fold up.
 |
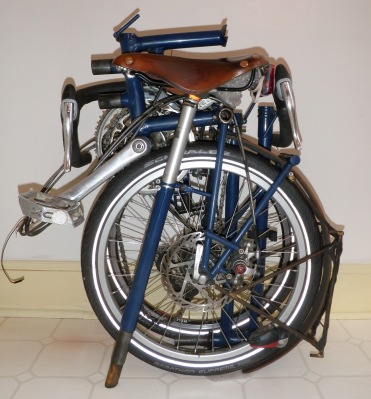
Eleven inches wide; and all the fragile and greasy stuff is inside. The exterior of the package is pretty durable.
 |
| Looking at the seatpost extender from the bottom up… First there is a peg of wood that helps hold the bike upright. Then there is the 1 1/8 .058 tube that fits into the seat tube. A 1 1/4 .058 tube goes over it, and it is silver brazed. The .1 1/8 .058 tube only goes up inside the other tube a couple inches. A 1 1/8 .035 tube takes it from there to the top. The .058 tube has big cutouts in it, less material as it goes up. Kind of like a lug, putting the reinforcement where it is needed, mostly at the bottom. Then you see the seatpost (26.8). There is a clamp thing with an arm coming out that pegs into a nut brazed to the left chainstay. An upper clamp on thing pegs into a spot behind the top of the seatpost as you look at the photo. I made a lot of seat post extenders that failed (bent) or were too heavy before I came up with this one. It is not heavy and it will not bend under my 165lbs. |
|
|
Small parts and connections to hold the bike together
|
 |
| Upper seatpost attachment. The short tube on the seatpost slides into the tube assembly that is clamped on the lower chainstay/pivot-pin tube (the one behind the bottom bracket). Almost all these little pieces in the following pictures are adjustable where they are clamped to. If I use a bigger tire (which would put the wheel in a slightly different place when kicked under) or different seat, I can adjust the pieces so they will still fit together. |
|
|
 |
| This thing clamped on the seatpost has an arm that engages into the nut brazed onto the chainstay (vertical tube to the right. The bolt on the left provides friction so when I push it up and the tab enters the nut, it stays there. |
 |
| seatpost assembly secured now. |
 |
| Boom tube to seat tube connection. A nail drops thru the lower connection to resist pulling forces. If it was not there, the tube would slip out a couple of millimeters or so after some heavy pedaling. This pin (nail) idea has worked great over tens of thousands of miles. The holes have not elongated and the pin has not developed notches. There is probably a more elegant solution to this issue but why fix what is not broken. |
|
|
|
|
|
 |
| Handlebar stem clamped on right side of front rack. Built in recess on the rack to accommodate the stem is seen here. |
|
|
 |
| Left side of fork crown closeup |
 |
| Upper left fork crown, with short tube (about 4cm long) projecting to the left. It is about a quarter inch inside the pivot pin already. |
 |
| Fork crown alignment tube is now pushed all the way inside the pivot pin. The fork crown and rear pivot area of the bike are held together now. |
 |
| The metal tab is pushed down behind the chain rail. This keeps the fork from coming out of the pivot pin. |
 |
The fork would still pivot forward or backward if not for this. Look at the 2 short horizontal tubes brazed to the fork leg on the right. They will engage with the chainstay when the fork is pushed into the pivot pin (fork is not pushed all the way in place yet, in this picture). That keeps everything solid. The quick release nut for the front wheel you see here is cut a bit shorter. It rests against the quick release nut for the rear wheel, also cut short. Brings the wheels closer together, making the folded package smaller.
 |
| The boom tube about to be hung onto the left leg of the fork crown. The brass bolt drops into the small hole you see there, and it stays in place just fine. Gravity and the confined space between the wheels keep it there. To remove, I just lift it out. |
|
 |
| Stem to fork connection. The same clamp tightens it on here and the on the steerer. |
 |
| Tucked under a table. |
 |
| fits almost anywhere. |
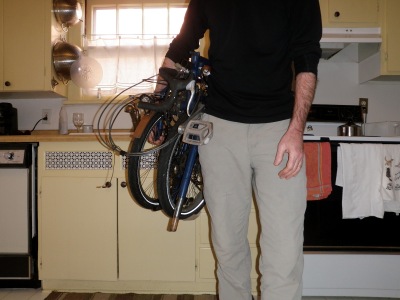 |
| To carry, I lean the leather saddle against my hip and hold the tube where the handlebar stem connects. Or I just grab the horizontal tube at the top of the folded bike. |
 |
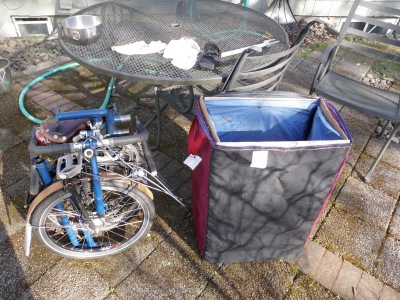
| Here is a airline legal size collapsible box I made. About 60 inches length/width/height added together. Limit is 62″. Plywood sheets drop into internal pockets to assemble from flat. |
 |
| When I remove the left pedal, the bike just drops in. |
 |
| To carry stuff, a bag I made loops over both brake levers, and is supported by the rack below. A velcro strap fixes it against the headtube, if I remember to secure it (it isn’t essential). The bag is about the size of a grocery sack. |
THE END


Interesting. I see that you put the chain on the hinge to prevent it from falling off when folding due to the decreased distance between the crank and hub. Cool idea.
LikeLike
Magnificent!
LikeLike
Do you have drawings? I saw Jim Gallant's and can't imagine how either of you could reproduce without drawings. It's really an excellent design, folds much smaller and more portable than my Bike Friday. Would love to try building one someday.
LikeLike
I don't have any drawings. If I make a new one I use the old one as a template and make a new drawing to build it. There are a lot of places where I have to be within a few millimeters or less to make everything fit together, so having a drawing with all the crucial measurements would be a good idea in case the bike is lost or stolen.
thanks for the comment
LikeLike
Impressive folding bike! There are a lot of things to learn from the design considerations you pointed out. Thank you for sharing.
LikeLike
Nice photoblog of the bike! But when you say “…not that much bigger than a Brompton when “folded”, and does not take that much longer to fold it…” I gotta raise a red flag. My 6-speed touring Brompton takes *at most* 10-15 seconds.
LikeLike
Hi Jimm,
Yes you save a minute on folding it. As long as you are okay with narrow 16″ tires and an upright riding stance all is good. There is an emphasis on folding speed when it comes to portable bikes these days, but like everything else in life it is a compromise.
LikeLike
Wow, there were so many things you added to this. How many versions or additions to the frame to get to this point? Great work
LikeLike