Folding bike #20


Note: I have expanded on this bikes folding details in this post. If you find yourself wanting more information, check it out!
This is the latest version of a folding bike I have been working on intermittently for about 25 years.
While I do not make any of these to sell, this post is here to inspire others interested in folding bike design. There is an enormous amount of bicycle design out there using conventional sized wheels, but the work on designing small wheel and folding versions is not nearly as much in comparison. After having studied, been inspired by, and having tried many different folding bikes, I realized what I wanted in a portable bike did not exist yet. Many people can be happy enough with a commercially available folder, but what I wanted was:
- A drop bar folder that could fold quickly (less than 2 minutes) to be a very compact and durable folded unit. To have it in a bag takes about 3 1/2 minutes total. The front bag I use with it converts into a bag I can drop the folded bike into.
- It was also important to me that it needs no box for intermodal transit. A cardboard box or hardshell case is simply not necessary. This is done by having all the components of the bike clamped together in the “fold”, with the fragile parts (like the chainrings and derailleurs) inside the folded structure. Also, both wheels are not removed from the frame when folded. That protects the fork, rear triangle, and front and rear racks from bending, and it helps protect the wheels themselves too.
- The folded size needs to be equal or less than the internationally recognized maximum size allowed for standard luggage, which is 62 inches of length/width/height added together.
- I want it to be super durable and use stock components as much as possible.
- I wanted it to be an “allroad” sort of bike; appropriate for road, gravel, and trail. That means accepting a mountain bike width tire (up to 2.6” with fenders), and equipped with at least one disc brake (it has a rear disc brake). A full range of gears was also necessary. It is a 3×9 with triple front chainrings
- It needs to have dynamo lights, front and rear racks, and fenders… which can all be left on during the folding process. These important installed components must not increase the folded size. The folding time with them installed must remain the same (1 or 2 minutes).
- The design needs to have no significant limitations related to the folding. A long wheelbase, front-center, and slack geometry will work with it. This is achieved by having points of separation both in front of the seat tube and at the fork crown. A long and slack small wheeler does better in chunky terrain than a shorter and steeper angled design.
My thought is that there are a lot of folks out there who would like their folding bike to have those capabilities. There is nothing today you can buy that does all this. The wonderful folding bikes at Bikefriday are about as close as you can get, but still lacking in most of those concepts. The Brompton has a great fold and is a great city bike but is not suited for off road use, mostly due to the small wheel and tire size limits. Eerder Metaal makes ingenious modified Bromptons that are off road capable. Although the fold is very quick, it is larger than the 62″ max I aim for (the Eerder is 73”). The concept of a folding bike that has the principal elements separated and clamped together is unique to this design.
DISCLAIMER: A person who wants something like this would probably have to try to make it themselves. Do not try to make a bike based on this design. You will crash and get injured and/or die. This design has not been professionally engineered. No finite element analysis has been done on it, whatever that is. You have been warned.
And if that doesn’t dissuade a person, they would need to first learn how to braze and make a normal steel bike and then make a few of them or more. Once that skill is there, the person could try to copy this one. There is enough information in this post to at least get started with that.

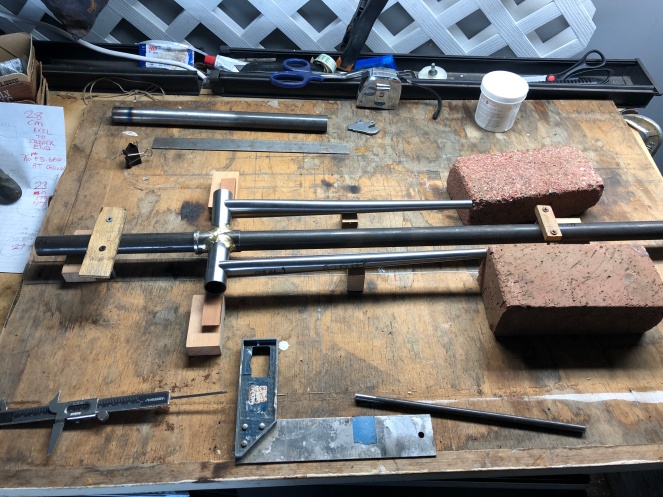
The photo above gives you an idea of the 2 dozen different sizes and wall thickness of cromo aircraft tubes I have used to make the frame, racks, and the folding/clamping parts for this bike. In addition to all the above, I use some bicycle frame specific steel tubings and parts: head tube, chainstays, fork blades, dropouts, cable braze-ons, and water bottle braze-ons. I don’t think this bike is all that complicated, but the number of different tubings I used really added up in a way that surprised me. This bike takes much longer to make than a normal bike frame because of all the detailed parts that require creative jigging to set up for brazing. The only testing it and its predecessors have had is by me, a 160 lb person, riding it hard for many years; decades now. A person who wants to make one like it would just have to figure the many things out on their own, and decide what specific tubing is most appropriate for them. A professional bicycle framebuilder is not likely to agree to try to build you something like this, even if you brought them a wheelbarrow full of cash. The ideas here are just a starting point for a competent engineer/fabricator. If that is you, maybe you could improve upon this design!

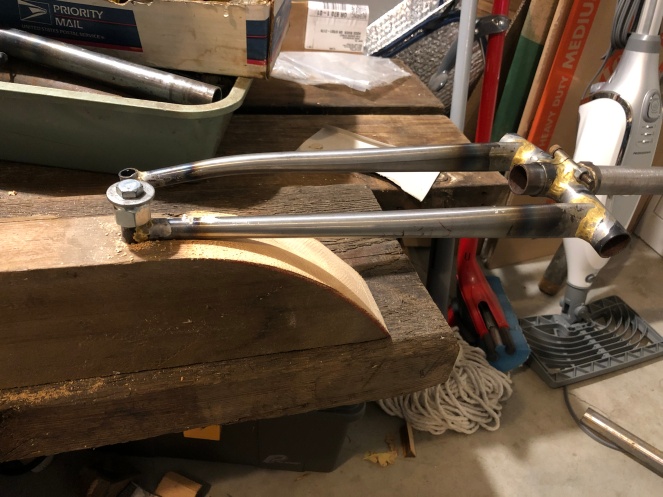
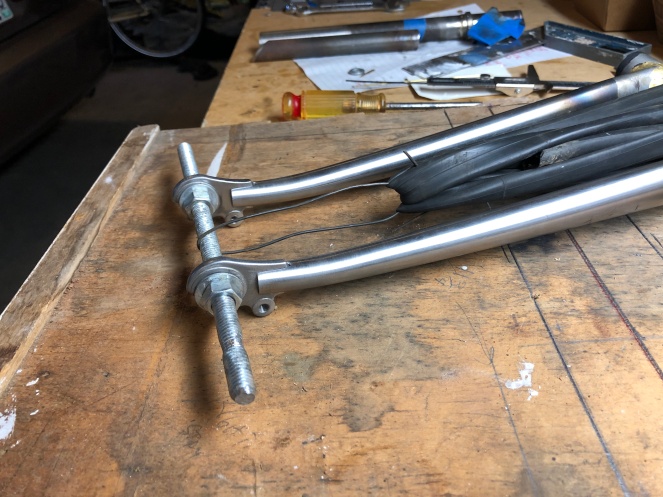
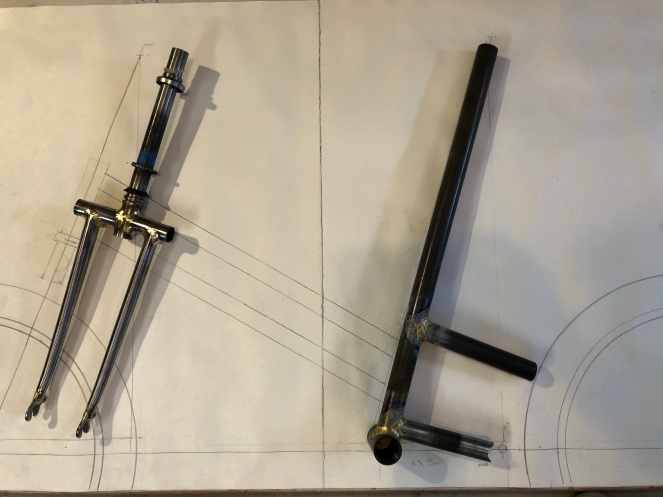
Just to give you an idea of the complexity here; above is the complete fork- rack included because it is brazed onto the fork and not removable. It has several attachments: handlebar clamping stub and the structure to hold it, pull-out fender strut mounts (for safety), 2 fender mount tabs, headlamp cage and adjustable headlight mount, linear pull brake mounts, and 4 brazed on items that allow the bike to be clamped together in its folded state. I hope I don’t crash and damage the fork to the point where it would need to be replaced! It would be a lot of work to make another.

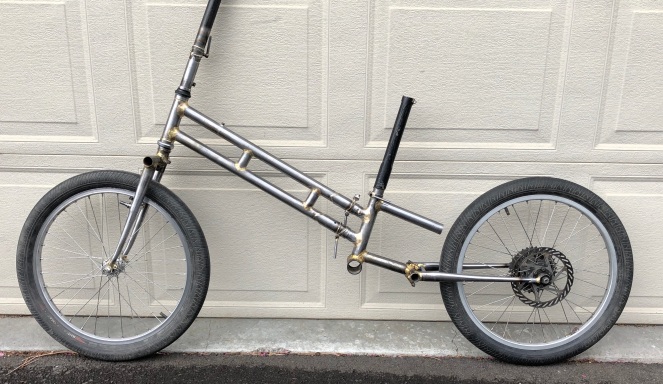
Above is folding bike #20 on a S24O overnight tour on the north side of Mt Hood, Oregon. Front and rear racks and dynamo light system are all installed.
I ride it about 5K miles a year in all conditions and on any surfaces. There have been lots of day trips, camping trips, and S24Os (sub 24 hour overnights). After about 5 years riding the heck out of the previous folding bike (bike #19, which looks a lot like this one), and altering many things about it using a torch and sawzall, the older bike #19 had become a bit of a Frankenstein that needed a fresh build. There are some improvements and changes I couldn’t do without building a new one. So I built this new one early in 2021.

It takes one or 2 minutes to fold the bike up depending on how coordinated I am about it. The rear wheel folds under the bottom bracket, and the other elements of the bike are detached and then clamped to each other. Photo above shows folded bike in different aspects. It stands up on its own and measures 28x21x12″. And that means I could put it in a steel box with those measurements and close the door. Nothing sticks out. It is a solid block that is very durable. It could tumble down a hill and stay in one piece. All the dirty and fragile bits like the derailleurs and chain are contained inside the structure. As you can see from the photos, the wheels, front and rear racks, fenders, and lights all remain in place. This allows the folded structure to retain a lot of solidity. One pedal is reversed (the left MKS Allways flat quick release pedal). I show how the bike integrates with transit at the bottom of this post.

I can stand on it without a problem. At camp when it is folded I can use it as a place to sit (on the rear rack). In the photo above, note the hubs are in-line and easily take the force of my weight. If the wheels were squeezed with enough force along the tires and rims, and anything bent, it would be some smaller tubing related to the clamping functions. The wheels, frame, and the other fundamental components of the bike should be fine. I suppose it could be a great bike for train-hopping. Toss it out of a moving boxcar and then jump out after it.
I did consider giving it a diet as much as possible. Smaller or thinner or lighter tubes here and there where this is possible. But after calculating all the grams saved, it would only be a pound or so. And I would end up with a bike perhaps a bit underbuilt for conditions where durability is what I value most. At times I want to use it for dirt road and trail riding, while carrying camping gear at the same time.
Geometry/design notes
The bike accepts a drop handlebar of 42cm wide or larger (shown with a 48cm Nitto noodle). This new version has a 70 degree head angle, 73 degree seat angle, 23mm fork offset, which makes lots of trail (69 mm with 2.0 tires). I have found that to work well with my 20” wheel bikes. Previous builds with low trail numbers did not work well for me. Chainstay is a long 48cm. Bottom bracket height is 10 5/8” with 2.0 tires, because I like a low bottom bracket. It accepts tires from 2.0” wide (with a low 10 5/8” BB clearance) up to 2.6” with fenders. A “mid-fat” 2.8 will probably work too, with the chain just clearing the tire in the lowest gear (I may need to trim the knobs on the right side of the tire). The smaller wheel makes chainline and chainring clearance details on this bike really easy, by using one tube behind the bottom bracket instead of 2 chainstay tubes.
Tires
My go-to all around tire is KHE park folding tire or the Odyssey Aitken 20×2.35” tire. The KHE is light fast and durable. The Odyssey is more trail oriented and has a central pattern that gives smooth riding on the road, with a knobby pattern along the side for trail. It is a single wall design, and described by Odyssey as a “trail tire”. Fairly lightweight and supple, even though it is a wire bead model.
The lightest most supple tire out there was the recently discontinued Box Hex Lab 20×1.95”. It was only 320 grams which is superlight in the BMX world. It was awesome. Maybe you can find a pair on ebay.
A close second to the Box tire is the KHE park folding tire, 20×2.3”, about 380 grams. It does not get very wide when installed (about 51mm on a Box rim, which is 28mm wide). So the advertised 2.3 width is misleading. But they are quite supple and more durable than the Box Hex Lab was. They are sold from Germany, but there may also be distributors in the US now. It is a good fast all around tire, although for trails I may use the Odyssey Aitken.
I have used the 20×2.6” Kenda slant 6, a plump cushy trail tire. They can slip in the rim in my experience, but they are great tires to use when conditions are rocky and technical. The new Kenda Booster Pro 20×2.4 knobby tire is another alternative. I don’t often use pure knobby tires because they buzz and wear faster on the road. The Odyssey Aitken 20×2.35 makes more sense for the mixed use riding I do.
There are lots of other BMX tires out there. Mostly they are heavy and extra durable tires made to hold up with BMX riding, and the exact opposite of supple.
Making the frame
No machine shop here.. or fancy frame jigs for that matter. I’m just a hobby builder. I first learned to build bicycle frames using the Paterek manual. A PDF of it can be downloaded for free here. Mr Paterek built bike frames without having a machine shop or using complicated jigging, and his process works great for hobby builders.
My frame is built out of mostly cromoly aircraft tubing without any machine tools at all. I use a grinder, sawzall (hacksaws work fine too but are more work), tin snips (for initial mitering of some .035 tubes), squares, yardsticks, string, DIY plywood fork jigging, files to shape miters, sandpaper, acetylene torch, brass and silver. I did use an adjustable reamer for reaming the seattube to accept a 1 1/8 tube. I am also making stems now which I ream so they fit well on the 1” steerer stub. All the other tube connections rely on the small gap between a tube easily fitting into a 1/8” larger tube with a .058 wall thickness. I got my tubing from Aircraft Spruce, and some bicycle specific tubes (headtube, BB, and fittings) from Framebuilders Supply. Also, I did have Golden Pliers bike shop in Portland cut the fork crown race for me. Using files, I was able to do an adequate job preparing the head tube for pressing the steel cups into.
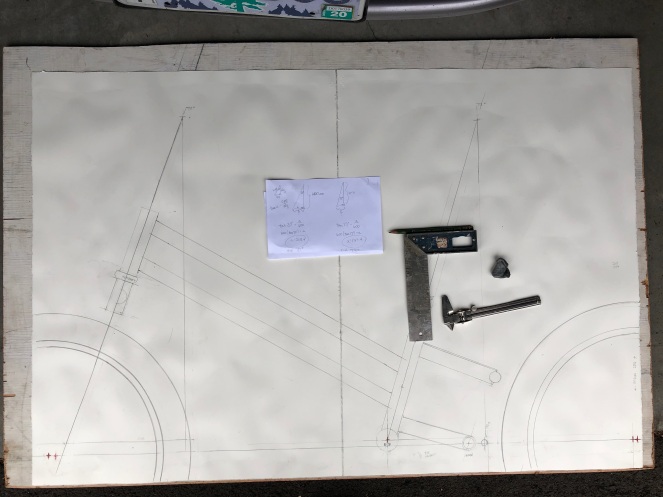
The Fork
I always start with the fork. That way I know exactly how long it turned out, from the axel to the fork crown, so I will know exactly where the head tube will be. Then I will make the full sized drawing (the old school way to do it). This fork is designed around the (narrow) 74mm front axel standard for folding bikes. The folded bike would be one inch wider if I designed it with 100mm front hub axel. That would still allow it to fit the 62” max bag size (it would be 62″), and a future version may use the 100mm standard. There are lots of extra issues with using the 74mm hub, but I managed it to figure it all out. The smaller width makes a significantly smaller folded result.


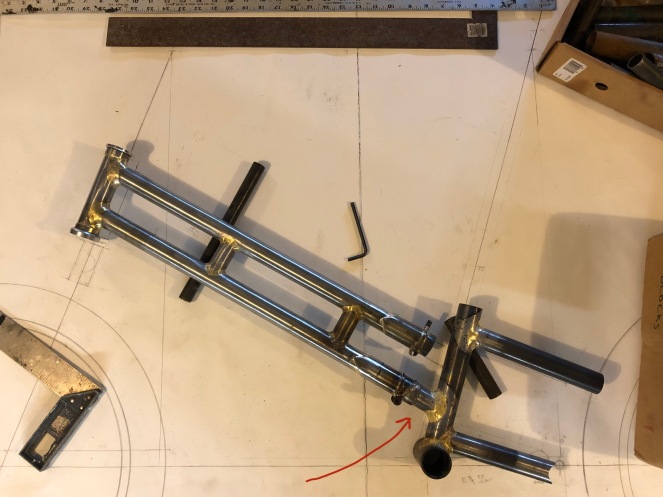
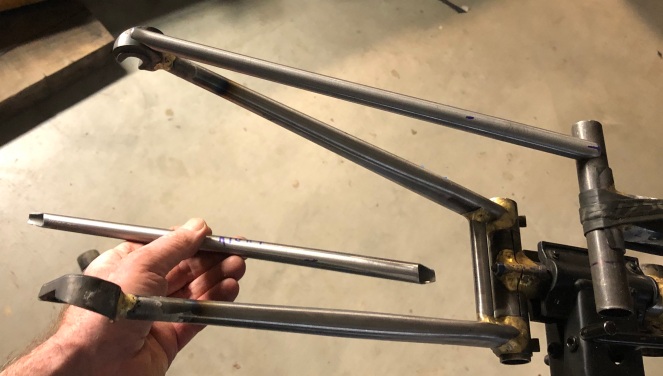
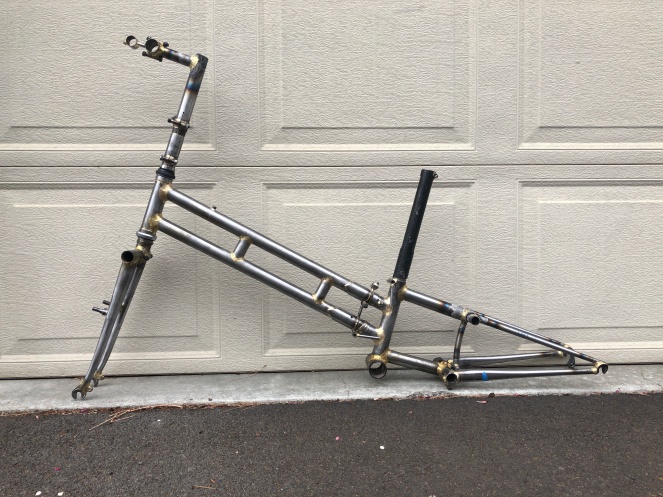
Main boom has been built, and I just set the short connecting tube (red arrow) in place. That locks in some of the important measurements of the frame. Everything is usually within a mm, and I align as I go on, using rulers, squares, and eyeballing. Later, I did need to cold set the main boom a bit to line up the head tube/seat tube parallel. It was off slightly. It was hard to do, because the structure is so stiff- much more so than a conventional steel frame. Thats probably why I have never had any speed shimmy on these bikes. I could make these tubes thinner I suppose. They are straight gauge 0.9mm wall, but 9/6/9 butted tubes would work here too.
It is interesting that no clamping joints involved in the folding on this bike actually have to be tightened to ride it, as long as I do not wheelie the bike (where the fork and stem parts may slip out). All connections include notches to align the tubes and prevent twisting. But the pin on the “down” tube (seen above) needs to be inserted to make sure the front and rear halves of the bike do not separate. Of course I always tighten all the clamp joints, but if I forget to tighten one it does not slip, because of the notches that keep the tubes aligned.
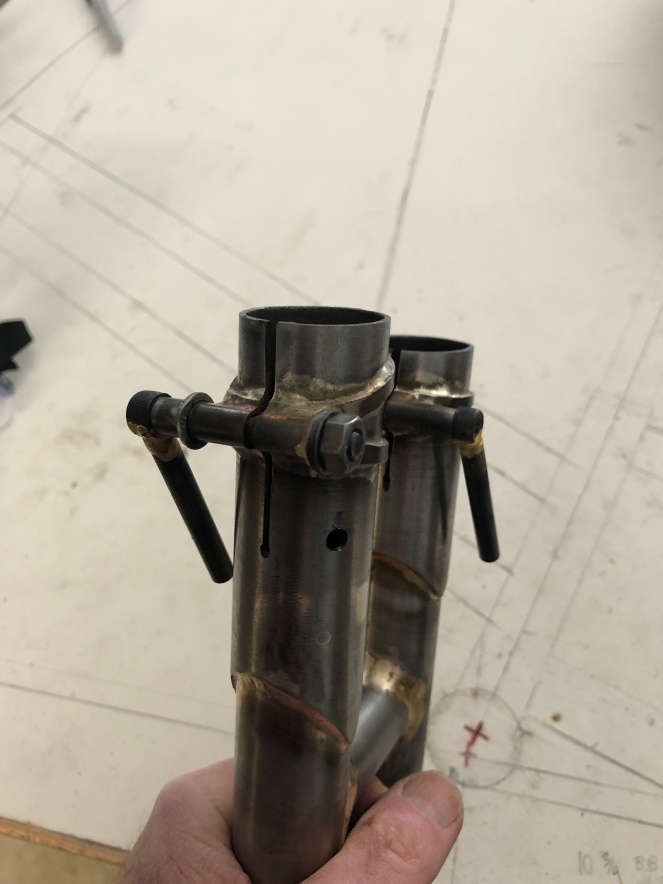


Here I am setting up to braze the brake bosses on for the linear pull brake on the fork. They are set so the pads will be as low as possible, allowing as much room as possible for the biggest tire possible, which is a 2.6” tire with room for fenders. I used a brake set I had to determine the precise location of the brazeons. A flat plate aligns them, and the file helps hold it down.

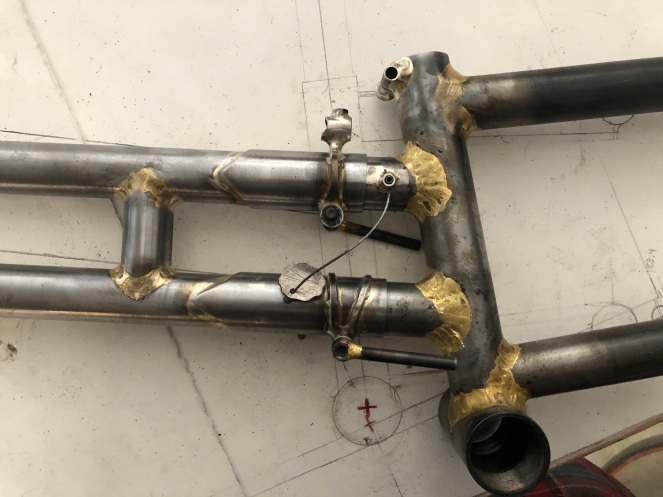
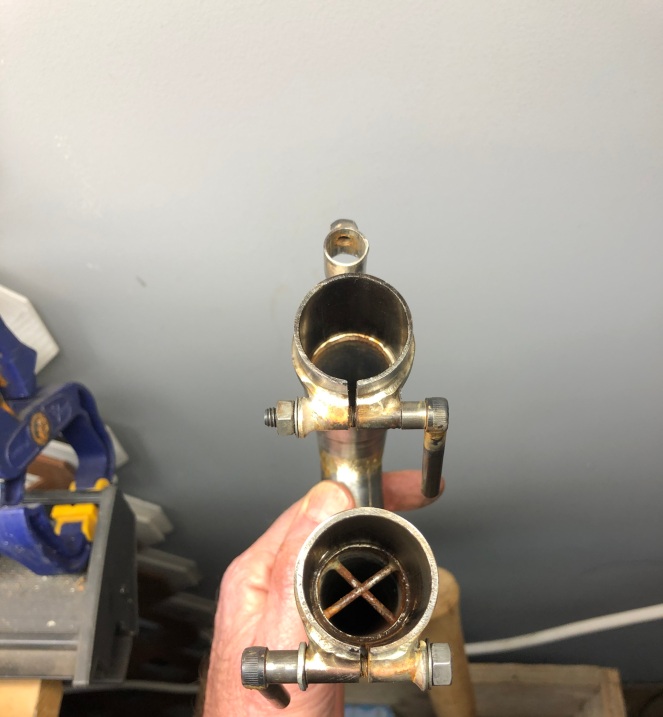
How is the threadless headset adjusted? It’s all inside the tube. The red arrow points to the (equivalent of) a starfangled nut inside the steerer stub. The green arrow points to the brazed in washer location that holds the bolt which tightens into that nut, pushing the sleeve down that fits over the stub of the steerer. Above all that is the stub that the handlebar stem assembly clamps to (which is covered by the aforementioned stem when the bike is assembled). All that tubing adds weight, but I could find no other reliable way to keep a solid adjustment on the headset.

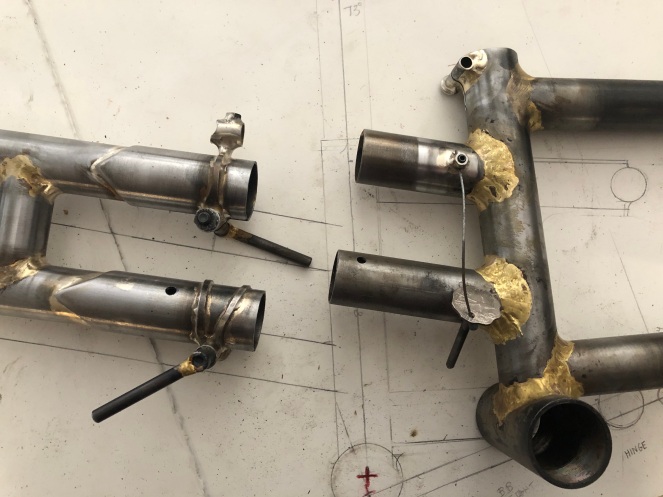
Setting up for the chainstays that will pivot the wheel under the BB. The metal plates in the lower picture are there to prevent the plywood from catching on fire when I tack the chainstays to the pivot tubes.
Chainstays are on and I clamped them down at the angle in the drawing. The wheels line up properly with frame and with each other thank goodness. I did have to do a bit of cold setting, but all is good. The bike should roll down the road like an arrow. I set the chainstay angle as per the drawing and measured the bottom bracket with the wheels with 2” tires on as pictured. It was 10 5/8” off the floor as I planned. Yes!
Each “seat stay” (the smaller tubes above the chainstays) needed a compound miter with a different radius on each end. It’s a process of cutting, filing, and eliminating metal; but not too much. It took couple hours to get them right. When I get close to the end it may be just a few file strokes between fit checks, where I use a light and magnifying spectacles to check the miter. I can do this without screwing it up now, but it does take some practice and mistakes to figure out how to do it. As with everything, there is a learning curve. After brazing them on I discovered that the chain rubbed against the right seatstay in the smallest cogs. So I had to un-braze it an install a new tube that I put a slight bend into which provided the necessary clearance.
In the picture above is the seat post extender that came off the old bike. I consists of 3 different tubes silver brazed together. The principal reinforcing one is gradually tapered to have less material at the top. This creates a condition of seatpost flex that makes the bike more comfortable.
How much does it weigh?
The steel cromoly frame weighs 10 1/2 lbs, which includes the handlebar stem and seat post extension. The finished bike with lights, racks, and fenders is around 31 lbs, and I am fine with that. It’s a no-nonsense practical bike that needs no white glove treatment.
Using light components as much as possible, like titanium bolts, plastic seat, carbon cranks etc, it should drop 2 or 3 pounds; maybe 28lbs. If I stripped it down in addition, (no rear rack, lights, fenders etc) it would weigh maybe 25 lbs or so. To have a professional frame builder with a machine shop make the frame and hardware out of titanium/carbon fiber in addition to all the above- maybe 23lbs. Get NASA involved- less than 20 lbs.
Obviously, it is not a “racing” bike. Nobody who has read this far is going to compare this bike frame to a 3 pound carbon racing bike frame I hope. But lets compare it to something a lot more useful and practical, like a good steel touring frame and fork, made out of a stout tubing designed for a touring bike (like a cromoly 9/6/9 tubing frame). A durable non-racing steel frame with fork would weigh about 7 or 8 lbs. This one, (minus the attached stem which is about 200 grams), is 2 or 3 pounds heavier. So lets say thats 2 1/2 pounds of nuts, bolts and clamps, along with some sturdy heavy gauge tubing in places that get the most stress. Most tubing of this frame is .035 wall (.9mm). None of the tubes are butted. Some clamps are .058”. The 8” long seat tube has a .065” wall. The 1” diameter steerer is a beefy straight gauge .095”. The upshot is I am carrying around 2 1/2 pounds of extra weight for the convenience of having a bike that I can ride anywhere, while it can also be easily transported and stored and is durable as heck. Part of the extra weight is also the hardware brazed onto the bike that allows it to be clamped together into a compact rigid box-like structure that needs no box for transport. It’s like it comes with its own cardboard bike box (which would weigh about 7 pounds).
What advantages and disadvantages does a small wheel bike have compared to a conventional bike?
ADVANTAGES
Much faster on a trip if you include intermodal transit time. If speed is everything, on a trip that includes a bus/train/plane ride- this bike rocks. I can pedal the loaded bike up to the bus station, train depot, or airport 6 minutes before I need to be there (or 4 minutes before if I have no camping gear). A bicycle tourist on a conventional bike will spend an entire day or more trying to find a box, tape, and protective material, breaking it all down and packing it, getting a ride to the transit hub, etc etc. Likewise, I can ride away from transit 6 minutes after I arrive at my destination. That can mean a time savings of one or more days! It pretty much eliminates the hassle and transit anxiety on any trip where intermodal options are used. At the bottom of this post are details on how it integrates with transit on a tour
A typical hard shell case for a conventional bike can weigh 10 to 20 lbs or more. Cardboard boxes with padding are 8 to 10 lbs. Together with the bike and extra stuff it is easy to reach the 50 lb limit. After exceeding 50 lbs, all sorts of surcharges can happen on a plane/bus/train. Being able to drop my bike into a nylon sack and be done with all the packing is huge. Since the sack is only a pound or so I can add plenty of extra stuff. I can put 15 pounds of extra stuff in the bag with the bike (remember the bike is already equipped with lights, racks, and fenders) before reaching the weight limit.
One way trips are easy to do when you can take transit to the starting point, or take it home.
Smaller wheels are much stronger than conventional wheels. Not likely to turn into tacos.
The long seatpost with its extender provides some built in flex, sort of a mini rear suspension.
The lower rack heights allows more stuff to be carried above the wheels. Also, front/rear racks can be stronger because don’t need to be as tall. Panniers may be unnecessary because of all the extra space above the wheels.
Pedals that can be easily removed are very useful when walking the bike on a narrow trail that cannot be ridden. Most folding bikes have these.
Small wheels are less likely to get tangled up on an overgrown trail while “bike-hiking”. I speak from experience here.
Easier to achieve a low gear. The small wheel gives a lower gear, but at the expense of higher gears. But there are always work-arounds for more gear choices. The low gear on this bike is a jaw dropping 15”, and I use it fairly often.
Toe overlap with the small front wheel will never happen. nuff said.
The low “top tube”/standover height of folding bikes is unlikely to cause a groin injury if you have to land on your feet in the rough stuff. A friend had to go to the ER after slamming his scrotum into the top tube. His experience was extremely painful, and not a rare event I think. My big wheel bike I designed with a top tube that slopes down a lot. The more space the better.
Other low top tube advantages
- All the space available (where a top tube would normally be) makes it easy to carry the bike by positioning the nose of the saddle over a shoulder.
- It is easy to mount and dismount the bike by swinging a leg in front of the seat post, as compared to swinging a leg around the rear of the bike. You really have to try this to understand. The transition from riding to walking and riding again on a short section of unrideable chunk is a quick and seamless maneuver when I can swing my leg in front of the seat mast.
Of course we know that an easy fold to a small size allows integration with transit. But the fold up option is helpful in less obvious ways as well. This is a great bike for “bike rafting”. I have used it with a canoe many times. A dangerous narrow road choked with RVs and truck can simply be bypassed by using transit or hitching a ride. No need to flag down a truck; a small passenger car can pick me up. When it comes to security, there is a lot to like about a folding bike. Hotels that prohibit bikes in the room can’t say no to a bagged bike. Bring it with you inside the restaurant. A bike cabled to a rack on the outside of a car is a target for thieves. Folding bikes can be hidden in the trunk. If I was at a sketchy campsite I suppose I would fold it up and bring it in the tent. The quick-fold feature of most portable bikes allows you to bring it inside any elevator.
DISADVANTAGES
It is way too easy to bail on a tour. Although that could be an advantage too I suppose.
Bike is heavier. More metal is needed to support a structure that has less triangulation. Lots of binder bolts add weight too.
The gear range is reduced. These days we talk about what percent gear range a particular setup of chainrings and cassette cogs will offer. For instance, a given set up may have a 500% gear range. But with smaller wheels comes less gear range for the same equipment. Using the gear inch way of measuring the gear range (instead of the percent range), we find when going from a 700c wheel to a 20” wheel, the actual gear inch range is reduced by about a 25%. It’s harder to get a good range of gears on a small wheel bike. The higher gears are the ones that are usually sacrificed. As an example, a 50/34 chainring and 11-34 cassette will have a spread of 95 gear inches on a 700c wheel (27 to 122 gear inches). The same exact chainring/cassette combination will have a spread of only 71 gear inches on the 20” wheel (20 to 91 gear inches). That’s significantly less.
For that reason, double or triple chainrings should be considered for small wheel bikes. Serious folding bike makers, like BikeFriday, make braze ons for front derailleurs which properly position the front deraileur. Without a special braze on, a front deraileur will not work on a small wheeler. The deraileur needs to be positioned more rearward. Small wheel bikes need front derailleurs even more than big wheel bikes which can use “one-by” systems. Not having a front deraileur on a small wheel bike limits its usefulness; the top gears for riding downhill or with the wind at your back are not there. This may be justified if the bike is regarded as just a “grocery-getter” or a city bike for smaller distances. But designing a small wheel bike without an accommodation for a front deraileur results in a bike with baked-in limitations.
Small wheels do not roll as easily over the chunky stuff. When rolling over an obstacle, the roll up is more abrupt. For example, a 700c wheel rolls over and clears a 2” thick stick in 14 inches of distance, while a 20” wheel clears it in 12 inches. A 700c wheel drops into a 6” pothole about 8mm, while the 20” wheel drops into the same pothole 10mm. For chunky technical terrain, with fat roots and baby head sized rocks, it is easier to roll thru with a bigger diameter wheel. The small wheel bike rider will be doing more walking on a route with difficult technical passages. On a small wheel bike, rough surfaces on dirt and gravel can be compensated for to some extent with wider tires. A 45mm wide tire on a 700c wheel may be similar to a 50 or 55mm wide smaller wheel. On pavement or relatively tame dirt/gravel surface I don’t find any difference of small vs large wheels. But if you want to ride fast over the chunky stuff, by all means use the biggest wheels you can.
Aren’t small wheel bikes squirrelly or inefficient? The “squirrelly” feeling of many commercially available small wheel bikes is not a given, and can be addressed by the bike design. Exploring frame geometry, using wider tires, and designing more wheelbase into the frame goes a long way into making it feel like a “normal” bike. The notion that small wheel bikes handle poorly comes from a very limited selection of bikes out there. Most folding bike makers do not have handling characteristics very high on the engineering to-do list. It’s hard enough to figure out how to get the darn thing to fold up reliably. Design related to the folding function can limit the options one has with a desired riding geometry. For example, maybe the wheelbase must be a certain length because of how the rear triangle folds up. I think a properly designed small wheel bike could handle really well, just as one can design and build a 700c wheel bike that handles terribly.
Well meaning cyclists try to explain to me about how small wheels are “inefficient”. It is an odd notion to have, considering that the fastest ever (183 mph) paced bicycle was a custom KHS bike using small wheels (about 20”). The speed record for an upright fared bicycle was made by a 17” wheel Moulton in the 1980s and hasn’t been broken yet. We assume pro racing uses 700c wheels because small wheels are inferior for racing. Racers and their teams use what they know works because change is difficult and risky or not allowed by the rules. It took many years for racers to shift from the narrow 23mm tire to the 25mm and 28mm, which we now know to be advantageous.
The small wheels make me look like I’m riding a kids bike. This is the real obstacle many of us cannot get over, and probably the single biggest reason why small wheel bikes are unlikely to ever go mainstream in the USA. In spite of the many real benefits a small wheel bike can offer, the unconventional appearance is the road too far.
Updates as of 11/2020


How is it integrated with transit during a tour?
In addition to the following, a detailed review of the bikes folding features is here.
What follows is how it all ties together when I am touring and I want to get on a bus/plane/train.
There is a front bag I use (photo below) while riding that carries lots of stuff. It unfurls to become a bag that the folded bike goes inside. If I have the foam sleeping pad, I use it to surround the bike inside the bag to provide extra protection. All the rest of the stuff I carry (cooking, sleeping, clothing, etc) can fit into the nylon duffle bag, which I use as an insert in the big black bag. Before getting on transit, I try to eat most of my food, get rid of extra water bottles, and put on any bulky clothing. The green duffle bag (third picture below) measures 11x22x14, which is the max legal size of carry-on baggage.


END
